Since Guild Ball seems to be kicking off again somewhat, I figured now might be a good time to go over some more gameplay concepts to think about when playing. While in the Tactical Toolbox articles I referred to general ideas to keep in mind and plans to consider when making decisions, I didn’t focus down on any specific examples. Here, instead, I’m going to go through one singular scenario and look at what factors in to the decisions being made and how they might play out.
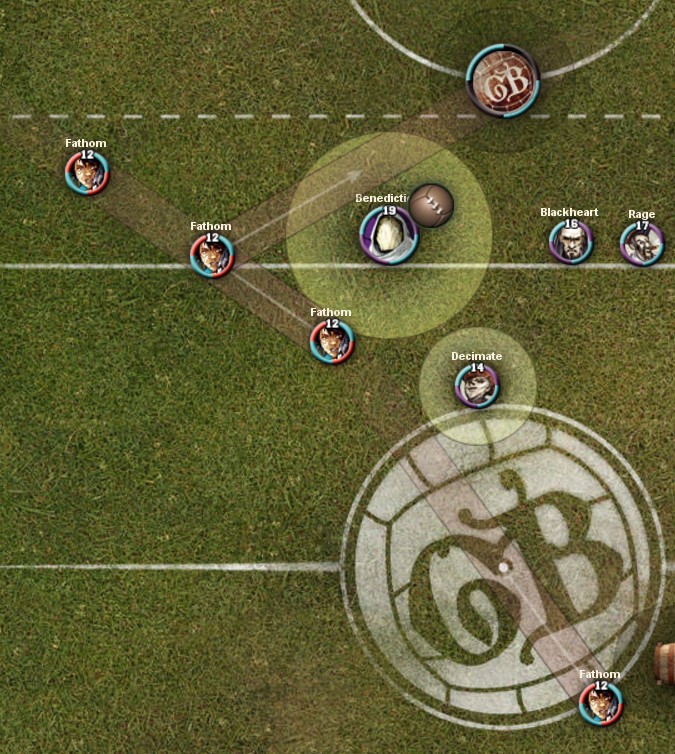
With that in mind, I’m going to start out at the beginning of the game with a kick off. While I’m using a specific team in this example, a lot of the concepts will carry over to others. The team ‘we’ are playing as is Union, since they don’t have many unique guild specific rules to take into account. Here is the game state after a well scattered kick off from the opponent:
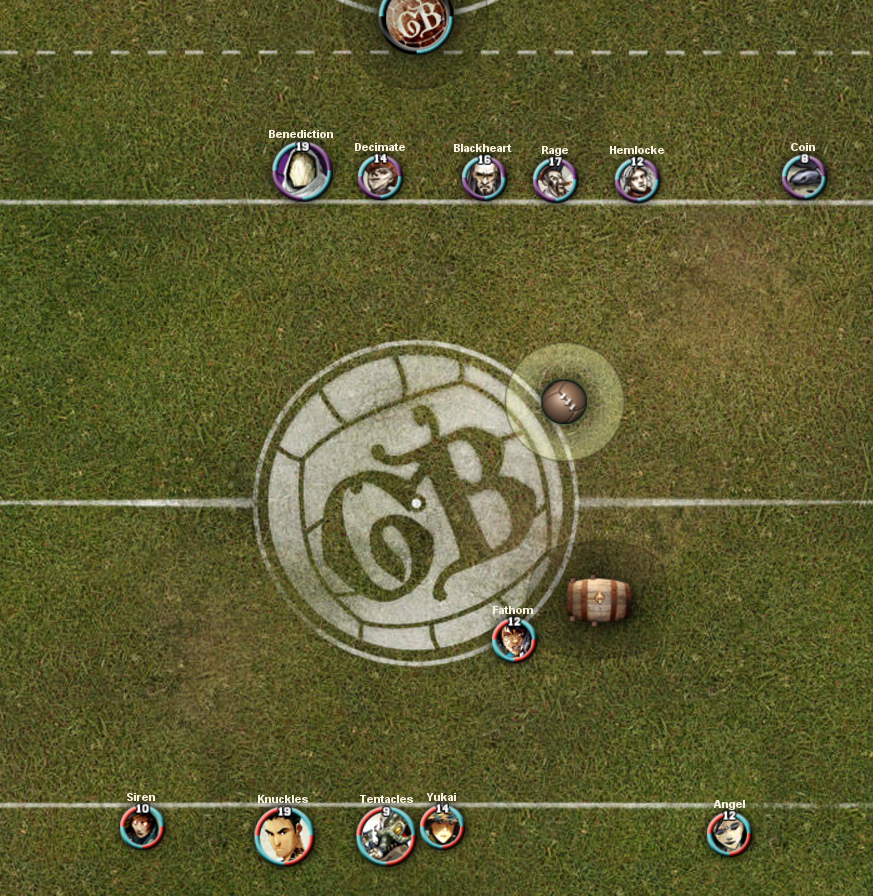
Fathom has just finished the kick off, and is sat nicely right next to an obstruction ready to use her Heroic. We’re allocating influence. At this point our biggest concern is a goal run from Fathom early in the turn, but we have a few options for dealing with it. We also should keep in mind that we probably also want to be doing something to set ourselves up for the future, or possibly getting some VPs of our own if possible. The Fish have the possibility of a strong last activation with Yukai’s legendary to throw someone up the pitch into a dangerous position for us.
When it comes to disrupting Fathom, we can put the ball on a model who can protect it, like with a counterattack. In this lineup that model is Benediction, who has Poised, 2″ melee, and a respectable 3/2 defensive statline with a solid playbook. Poised means that if Fathom charges (which she’ll have to, if she wants to get any MP while attacking a model with ARM 2) you can both counterattack and defensive stance for only 1MP, which is useful when your first activation is probably going to involve securing the ball and passing it but probably not generating any more MP elsewhere. In the above scenario, Benediction is within 14″ of Fathom, which means she can heroic to dodge 4″, then charge 8″ with a 2″ melee zone to engage. If you get the counterattack off, Benny’s Knockdown is unlikely but his double push and tackle results are not unreasonable to expect with TAC6. However, Fathom has a mT<< result on her playbook, which would allow her to take the ball and get away from any counter. If she doesn’t reach the mT<< result, she would need to take the m< result, survive the counterattack, attack again (all hits) for the non-mom T result, and then shoot while engaged without a point of MP to bonus time. This is not a great line to be taking, so Fathom definitely wants to charge, take the mT<< and get out immediately. This isn’t unlikely to happen if all we do is pass to Benediction, so if we want to mitigate this we need to do something more – there are three main options here.
We could put models in the way of Fathom’s threat lanes. If she has to end her charge engaged by someone, her odds of reaching the mT<< fall a lot, and if we can cover the area she wants to be in when she begins her charge, she can’t charge while engaged at all. She does have Acrobatic to work around us, but it limits her options and costs her more INF. However, her first activation goal run is still definitely on the cards.
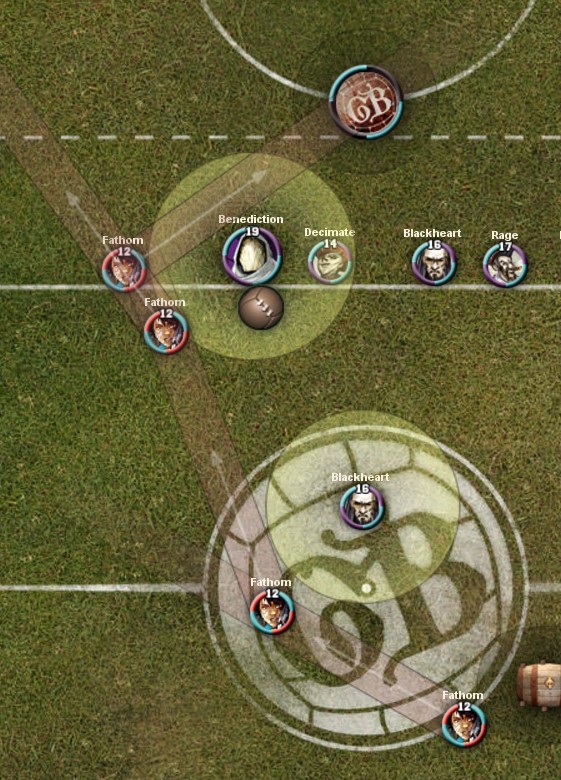
Even if 2″ Blackheart is in the way, Heroic + Acrobatic gets Fathom a charge line on Benny for a 2 die shot.
Secondly, we could move Benny further away. If we successfully pass to Benediction, we could dodge him away from Fathom, which can get him far enough away that her odds of connecting for a goal are zero. This is guaranteed to stop the immediate goal run, but it has its own issues. If we keep the ball that far away, we can’t use it ourselves, which means none of our models will get to do anything on turn one, except possibly Blackheart if he uses his Legendary play for a 2″ dodge to reach engagement with Fathom. Our opponent also has the last activation, and could use Yukai’s legendary to flip Fathom or Knuckles into a position to threaten the ball at the end of the turn anyway, probably while staying outside of our threat ranges as well. This doesn’t feel like a good look. We also might need to move behind our goal line, at which point we stop generating MP.
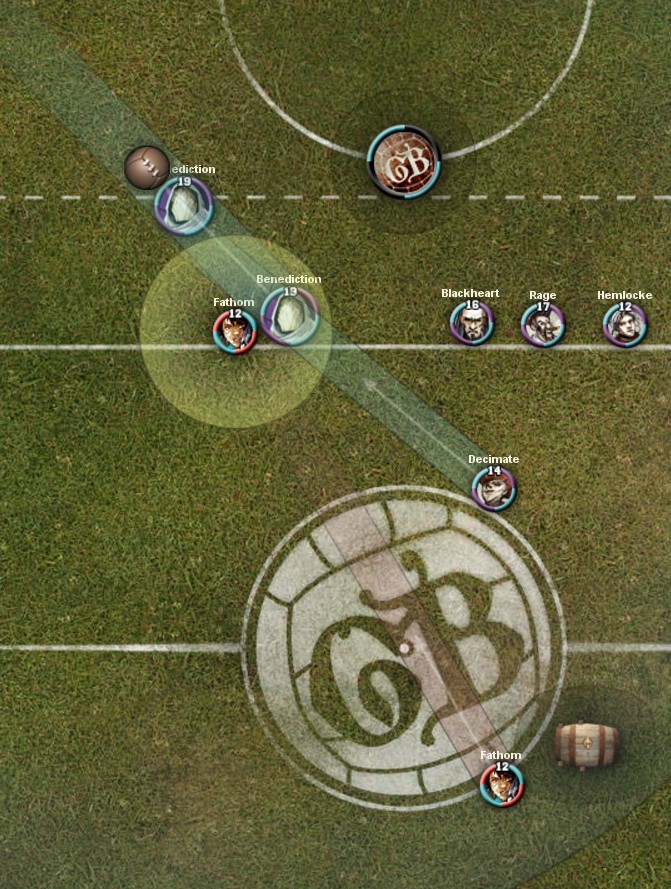
Benny can dodge far enough away to be safe from Fathom, but the Union then does nothing turn one.
Thirdly, we could directly disrupt Fathom. Fathom needs to Heroic to get into range of Benediction – if we can get a movement reducing condition onto her like KD, she can’t clear that condition for MP without locking herself out of her heroic, until the Fish can get some more MP somehow. We don’t have many options for getting a KD onto her though – it’s basically just Blackheart and even then it’s not super likely. If she’s taken out, then you’re in a much better spot because the primary threat is resolved and your opponent loses an activation, which means they can’t legendary someone up the pitch with Yukai and then try to get the ball and score after all your models have activated. There is also the possibility of tagging Fathom with Blind, which would mitigate her ability to score significantly, but she is DEF5 and Blind is a one influence character play, so this is also risky.
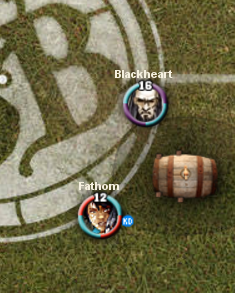
Getting a KD onto Fathom heavily reduces her turn one threat, but it’s hard to pull off.
So we have a few different options, all of which have their own downsides. Looking at each of our possible first activations in order, Benediction can be ignored as a possibility because he’s too far from the ball to reach it.
Decimate could sprint and pass to Benediction while standing in the way, jog and pass to someone else, or sprint and Thousand Cuts Fathom. Passing to Benny is okay but we probably concede a goal, since Fathom can acrobatic to avoid Decimate’s melee zone or just charge straight through since Decimate doesn’t have a KD on her parting blow. Passing to Blackheart or Hemlocke is less effective than passing to Benny, but does mean we have the ball more ‘live’ to use next activation and attempt to disrupt Fathom further, if she doesn’t go immediately – and if she does go on a goal run immediately she’s right next to our team and can be beaten up for momentum. Buying Thousand Cuts means the ball is very unsafe – while it does make Fathom more vulnerably to followup, she can probably just immediately grab the ball and run away back to her team for a last activation goal and leave the Union unable to do anything useful, so we can forget that one.
Fathom can easily heroic – charge – mT<< – acrobatic – shoot if we put the ball on Benny, and RtL to safety. With def stance + poised, she is about 66% to hit the mT<< on the charge.
Blackheart could shadowlike / jog up, grab the ball, pass it back to someone for a dodge to engage Fathom, and hit her. All of the possible pass targets are 1″ melee, and he won’t be in range for Benediction’s free pass, so the ball is somewhat vulnerable and BH will get to make 5 attacks into Fathom. This isn’t going to take her out, and you need quite a bit of luck to get the KD. However if you do get the KD, then things are looking really promising since she stops being able to heroic, and if another Fish comes in on Blackheart to get some MP you can go in with Hemlocke for a Blind afterwards, or have Rage use Playmaker to gain range and possibly kill Fathom second activation. Spiking the KD is unreliable but five swings is enough to make it doable. You lose the best chance you have at a snapback goal or a good answer to an aggressive Yukai legendary last activation, however. Blackheart could also just pass – On My Mark – pass to get some MP and stand in the way, but this is probably a waste of a captain activation you want to be scoring VPs with.
Fathom can score if Blackheart doesn’t reach the KD – the cover probably makes this too unreliable. Rage threatens to follow up, though, and you could charge to make Fathom spent the MP for Defensive Stance and slow her t1 down.
Rage is not going to be in range unless you have the ball. He can go get it, but his 1 inf cap means he can’t both pass and Tooled Up Blackheart (unless he heroics, but then you don’t have counterattack MP). You can’t get into Playmaker range while retrieving the ball on a jog. This is awkward because Blackheart has much higher chances of taking out Fathom if he has Tooled Up, so you want to activate Rage but can’t afford to do so first.
Hemlocke can sprint for the ball, pass it for 1MP (potentially to Benny) and then Bonus Time a Blind on Fathom. This play has just over 50/50 odds of success, so it’s not super reliable but if it hits then you are in a great position for turn one. In a vacuum you’d prefer to use Bag of Coffers to bonus time your Blind and save the MP, but securing the ball is the priority. While you end up on zero MP, if you can get the ball to Benediction then this is less of a problem because he has Poised to make a counterattack even if you spent down to zero. If you miss the Blind, Fathom probably scores, so this is a high risk line but the rewards are there.
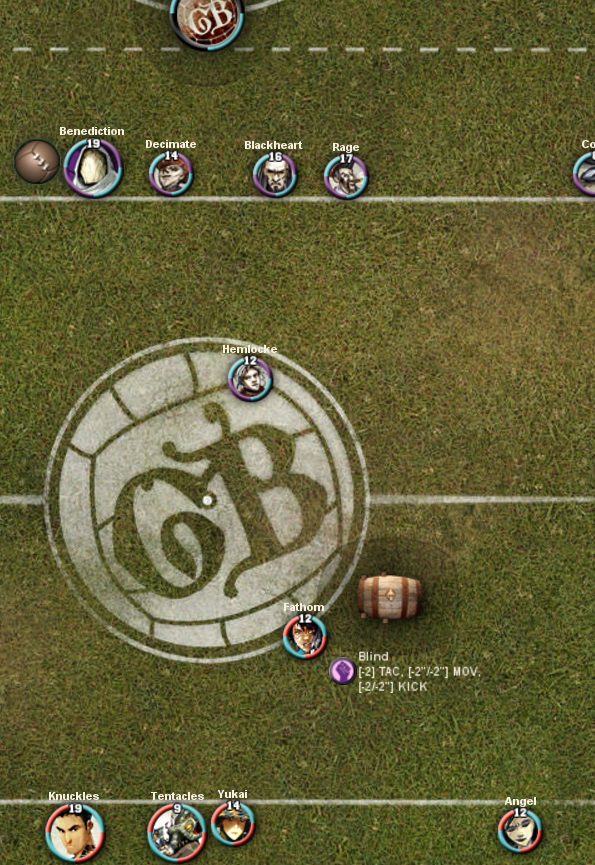
Blinding Fathom means she won’t score turn one – if you miss this is just as awkward as the Decimate start. You could pass to BH/Rage to apply more pressure, but Fathom might be able to score while blinded in that scenario.
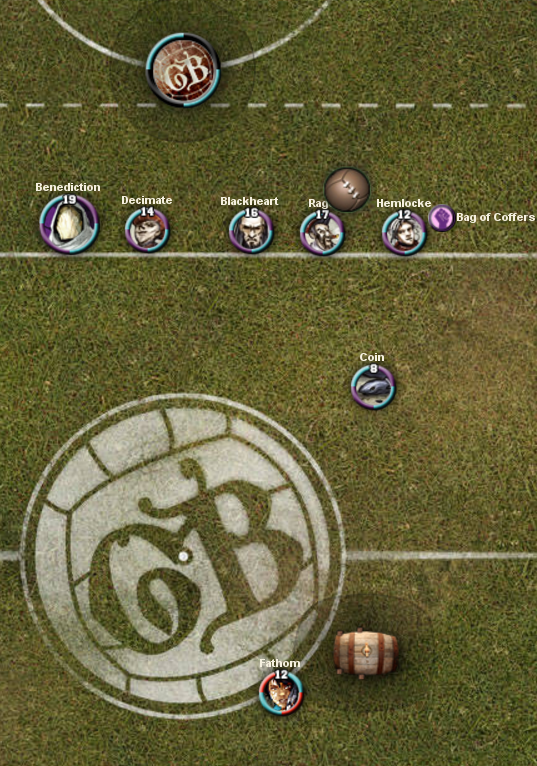
Finally, there’s Coin. Coin is in range to sprint for the ball and then pass it to Hemlocke or Rage, but probably not anyone else. You can also Bag of Coffers Hemlocke in the same activation, which is nice, and if you leave the ball on Rage you can also use Playmaker to threaten to charge Fathom – Rage has the potential to take Fathom out in a single activation if he heroics to put Tooled Up on himself first, so this forces Fathom to activate immediately. However, the ball is on Rage, which means it’s pretty easy to tackle. Coin is in the way with Follow Up and Blackheart has 2″ melee as well, but 4/0 defenses mean that Fathom is probably going to get the ball and dodge out anyway – so this line is very likely to mean your opponent scores a goal on their first activation. However, like with the ‘Decimate passes back’ lines, this does mean that you have a model you can build momentum on for your turn, and you still have Rage/Blackheart/Hemlocke to threaten to disrupt anyone Yukai throws up the pitch later on in the turn. You also have enough melee zones and bodies nearby that someone will probably be in the way of Fathom’s goal shot, which means it’ll be a 1 die affair. She might be able to Bonus Time to 2, but it might be difficult getting the MP. She will probably still score since even at one die she’s got 75% odds due to the Navigator reroll, but if she misses the Fish are instantly in enormous trouble – the ball is in the middle of the Union team, you’re up loads of MP, you can even go for a goal yourself if you want to. This isn’t a likely scenario but it’s not impossible either.
Fathom can definitely score right away, but she has to end up in a lethal position afterwards, and if she doesn’t go first then she’s in trouble.
So there are three possible first activations I like the feel of here – Decimate, Hemlocke and Coin. Decimate is the most ‘standard’ option since you finish your first activation with a point of momentum and the ball on your ‘ball holder’ player. It might well not actually prevent your opponent’s first activation goal threat though, and if they do score immediately then Fathom can dodge out onto the left flank where she’s somewhat safe from retaliation, or at least it’ll cost you a bunch of influence to connect with her. Hemlocke and Coin are both riskier activations, but in very different ways. Hemlocke’s Blind is unreliable but sets you up for an excellent turn one if it hits, so you’re pretty much putting turn one success down to a coin flip. Coin is also risky in that it puts the game into a much more volatile state – you give up one advantage to your opponent (4VP) in exchange for a different one for yourself (a model to beat up / build MP on, and all your payoffs ready to activate). I personally think the Hemlocke and Coin activations are both more interesting and more likely to result in a game win than the Decimate line – Hemlocke leaves the advantage up to the dice where Coin depends on how well you can pull ahead with the extra MP / damage you get out of a probable good Rage activation. The Coin line also gives your opponent more opportunity to mess up – if they don’t immediately respond with a Fathom goal run and you can either Blind Fathom with Hemlocke or take her out with Rage, or the shot misses, you are in a very promising position for the rest of the turn, which they might just not think to expect.

Fathom’s goal run is reliable, with a 2 die shot and rerolls, but if it misses or doesn’t happen immediately you have a major advantage, and even if she scores you have someone to build MP on.
I’m going to do more articles along these lines in the future with other scenarios, but figured that the very first activation of the game would be a good place to start. Have a think about if there’s any other options I could have considered here, or if there’s anything I’m not taking into account when thinking about how this could end up going or possible downsides to these options presented – I think seeing possible lines of play in situations like this – and considering and acting on them without spending too much clock time in the process – is a great skill to have, both for GB and for other games as well.
Until next time,
-Henry
