Second to last of the Major Guilds in our S4 reviews are the Alchemists. The Alchemists have a very focused condition based playstyle. They’re the team that is likely to set your players on fire and poison them, and then use that condition to improve their abilities in other ways. They’re a team that leans towards goalscoring, and doesn’t really have anyone exceptionally durable, but they’re very fast and have plenty of ranged effects.
Midas
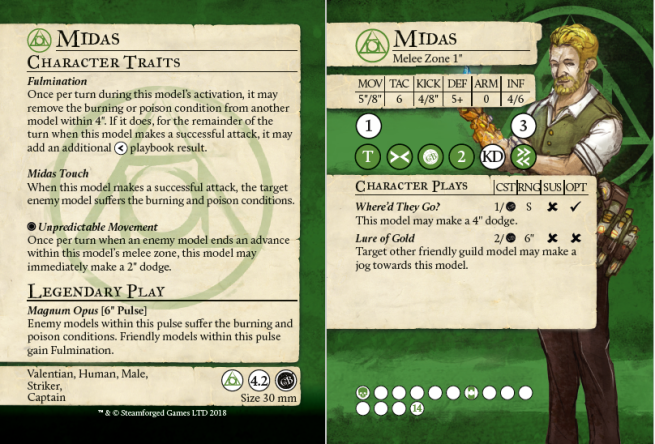
Midas is a clearly footballing focused captain, and has all the things you’d want in one. He has good TAC numbers, an easy 2″ disengage and easy tackle in his playbook, and reasonable 5/0/14 defensive numbers. He’s not very fast on the jog but Sprints well, and has great kick stats. His damage is terrible for a captain so don’t expect any of that, but other than that he’s looking pretty solid.
Where’d They Go? is a buyable dodge which is always excellent on a scoring model. It helps Midas deal with counterattacks which would otherwise leave him stranded, and extend his threat range to an impressive 13″. WTG is more efficient in terms of inches per point of influence than sprinting or buying attacks, but be aware that if you haven’t used it in your activation your counterattack gets a bit better, since you have a 4″ dodge on your third column. However, Midas doesn’t exactly get to use his counterattack often.. It also lets him engage a ball carrier without having to deal with Unpredictable Movement which is helpful for getting around ball killing tech.
Lure of Gold gives Midas something to do if the ball is not in play for some reason, and lets you be very aggressive on turn one and threaten the enemy with 2-3 models early in the turn. Triggering Lure of Gold momentously on the playbook also helps Midas set up his team for crowdouts for ‘free’ while making attacks. Note that it can be used multiple times on the same model, but has to be ‘Towards’ Midas, so you can curve them round in front of him, then move and pull them even further if you really want Katalyst right up on the enemy immediately. It’s important not to overextend, though, as it’s very easy to do so with the sheer amount of movement Lure of Gold provides.
Fulmination is a fantastic effect and very cheap / easy to activate. Burning and Poison are readily available on anyone the Alchemists are playing against, and it’s also trivial to re-apply them after you remove the condition to fuel Fulmination. Note that Fulmination applies for the whole turn, not just the activation, so it makes Midas’ counter attacks great if he ever needs to make them. The big part, however, is giving him access to a momentous ><< result on his second column. This is great for bouncing between multiple enemies to avoid counter attacks, getting in goal range to score while unengaged, and dragging enemy models around into places where your team can beat them up.
Midas Touch lets our hero set up for himself with Fulmination, even if there are no conditions already out. Since you’ll likely buy multiple attacks on the same target at some point in the turn, it makes Fulmination effectively free and just makes Midas’ playbook excellent all the time. While you aren’t going to be aiming for takeouts, it’s so trivial to apply Poison and Burning that you still have some game if things take a little while to play out, and at the very least you get to drain the enemy team of momentum without it actually costing you anything, and a free movement debuff is useful on a team with a reasonable number of players who want to keep their distance from the enemy.
Unpredictable Movement is a good tool for durability, although interestingly it does mean that the strength of Midas’ counterattack matters very infrequently. Since Midas has a 1″ melee zone, it helps a lot against other 1″ melee models and does pretty much nothing to enemies with longer reach. Be aware that while you don’t have to use it if a 0-influence model walks up to Midas, if he’s already next to two models a third one can move to pin him in in a triangle and prevent him dodging away. Midas’ defensive stats are okay but definitely can be one rounded by a dedicated damage dealer / captain – UM helps cut down on those who can, and forces a lot of takeout focused captains (Hammer, for example) to use the ball to dodge in if they want to engage Midas.
Magnum Opus has two very useful effects which are quite difficult to apply simultaneously. If you want to condition the whole enemy team, you want to be up far forward, where if you want to grant your allies Fulmination you probably want to be further back. Where’d They Go? can be used to get into the right place to do both at once without spending your advance, however, and Midas only really needs conditions to be present on one enemy in order to do his thing, since once he’s activated Fulmination he doesn’t care about them very much any more. Speaking of Fulmination, this effect is very powerful on a lot of Alchemist squaddies. Many of them have a first column tackle result, which is extremely impactful when you get to add a dodge to it, letting you disengage from most enemies without repercussions while on followup goal runs. Crucible, in particular, really likes Fulmination because she has 2″ melee, an easy T result, but is quite vulnerable to counterattacks. Unless you’re activating Midas very late in a turn, legendarying on your own team is usually more impactful than putting it on the enemy.
Midas is a goal scorer who runs at the ball, tackles it and scores. He’s excellent at it too, though not the most impactful – he is up there with Shark in super solo ability. He also brings a good amount of utility to the team. He’s consistent and very capable of applying conditions to the enemy for his teammates to use, and Lure Of Gold is a great utility move for setting up multiple models to pressure the opponent with on turn one, or just for getting vKatalyst where he needs to be to kill things. In general, Midas is at his best against teams which are difficult to kill (so scoring is an easier route to VPs than takeouts) but don’t hide the ball well, or where a fighting game plan would be difficult to come out ahead with. Farmers are the obvious example, but it also potentially applies to Butchers and Falconers and other teams where aggressively pursuing goals is strong. The Alchemists’ fighting gameplan is also slow and takes a while to actually generate VPs, which can mean it’s difficult to execute against fast footballing teams. Midas enables a much more aggressive gameplan which can score VPs quickly and present multiple threats, which can be useful in those matchups. Generally, he’s at his best when being aggressive against opponents who can’t control the ball, but he’s always a fine choice at minimum.
Smoke
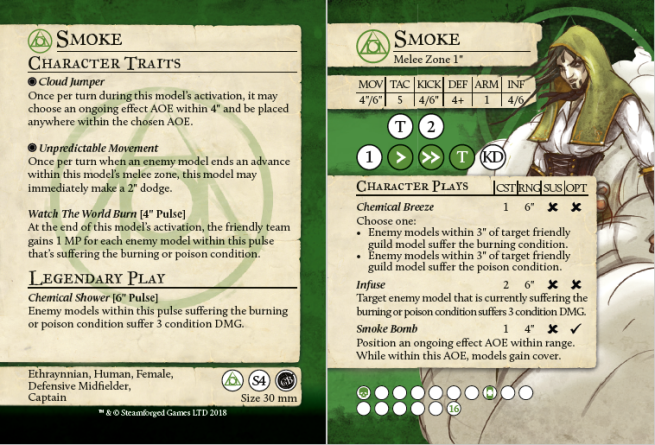
Smoke’s statline isn’t great, barring a pretty reasonable 4/6″ KICK stat (though still not as good as Midas). Her TAC is a bit on the low side and she isn’t jogging very far either – and her playbook is pretty awful. Reaching Smoke’s second column Tackle with TAC5 is much harder than Midas’ first column version with TAC6. She also isn’t going to be taking someone out with attacks any time soon. If you’re playing Smoke, it’s for her plays and traits, not her raw numbers.
Chemical Breeze lets Smoke trivially apply conditions to a large number of models for a very small influence investment. It does take away from her ability to spend that INF on other things, though, so if you have the opportunity then applying the conditions with someone else makes sense. Be aware that applying Burning for the MOV debuff is a bit less useful than it appears, since if there’s a friendly model within 3″ of the target then they can still at least reach someone – it’s difficult to completely blank influence here, but it’s still a useful effect to have available.
Infuse is a powerful payoff for having conditions up on people, and gives Smoke a pretty strong takeout plan. 3 damage doesn’t seem like a huge amount, but it isn’t OPT and since it’s Condition Damage it ignores Tough Hide. Usually you’re going to want to activate Smoke late in a turn, Infuse for damage, let conditions tick in the end phase, then go first with Smoke again and throw a load more Infuses to finish the target off, then run away to prevent attacks back. This is a pretty effective plan into a lot of teams – particularly slow ones who can’t effectively interact with you at range – but does mean you’re spending a lot of influence for very little momentum generation, so it tends to fall apart if the enemy actually reaches you. As such, I’d recommend not letting the enemy reach you.
Smoke Bomb combines with Cloud Jumper to effectively give Smoke a 1 influence ~8″ place effect, which is a fantastic mobility tool and more than makes up for her low movement numbers. This means Smoke can go ahead and take the above Infuse line on turn one if she needs to. Note that she can also teleport to allies’ and enemies’ AOEs, which is pretty handy on occasion – she does count as entering them when she does so, so she’ll eat the occasional Poison or Fire effect from Noxious Blast or Fire Blast. However, if there’s an AOE she can hijack and the enemy is already conditioned, Smoke gets to buy 3 Infuses rather than only 2 which is a pretty relevant upside and often worth eating the condition. It’s not like Alchemists don’t have ways of removing Poison and Burning from friendly models, also.
Unpredictable Movement is pretty much exactly the same on Smoke as it is on Midas, only if anything more important – since Smoke’s counterattack is a lot worse than Midas’, you really need to take advantage of Unpredictable Movement and her ability to do stuff at range to keep her alive.
Watch the World Burn helps Smoke to make up for the amount of influence the Alchemists often spend on non-momentous character plays. Generating momentum for ‘free’ without having to actually roll dice is a great tool to have, and something to be played towards. However, having Smoke end her activation within 4″ of multiple enemies is a good way of getting her taken out, so it’s something to be only used with caution. As mentioned above, the default line would be to go in on the last activation of the turn to do damage, get MP with WTWB, win initiative, kill someone and run away. Note that unlike a lot of the Alchemists’ condition-eating abilities, Watch the World Burn only works on enemy models – you can’t set your own team on fire for free momentum sadly.
Chemical Shower helps Smoke with the aforementioned one rounding. If Smoke needs to spend INF on Cloud Jumper, then she can deal 6 damage with Infuses, 3 with Chemical Shower, 3 from the end phase, and then another 9 with Infuses the next turn for a total of 18 damage, enough to take out a lot of models – however, she needs to hit with a low of two-die character plays. Low defense tough hide models are particularly vulnerable to Smoke, since the trait does nothing against all the condition damage and their defense makes her take out more reliable. The main power of this effect is that Smoke can apply it from a long way away, and so gets to pick who she targets. If she needs to use Chemical Breeze she threatens 15″, or 18″ if the target is already conditioned. As such you can specifically target the enemy captain or other important models in the lineup.
Smoke plays a somewhat more takeout oriented game than Midas, but with Cloud Jumper she isn’t bad at football either – or rather, she’s very good at putting the ball in the goal but not great at getting it back, which often means she’s aiming for a 2-2 or 1-4 plan rather than Midas’ 2-2 or 3-0. She generally plays a somewhat slower game – letting the opponent generate much momentum is risky for Smoke, because the team doesn’t generate much momentum themselves, and at the same time Smoke’s best plan for actually generating victory points gets a lot harder if you aren’t winning initiative. As such, Smoke is particularly good against enemies with shorter threat ranges and a reliance on melee combat to generate momentum, such as Masons, Blacksmiths and Brewers. It’s often correct with Smoke to just stay back and force the enemy to come to you, meaning they’ve been already damaged by conditions and character plays before they get there and you have a much easier time finishing them off. Smoke has a much more limited amount of damage and momentum generation than most ‘damage dealing’ captains, and she also doesn’t really support her team all that much, so the important thing is to take advantage of her very real upsides – her mobility and ability to ‘scalpel’ out enemies and ignore a lot of defensive effects. I’d recommend not missing with Infuse.
Soma / Pneuma

Soma is a coach, and it shows in their statline. With a TAC of 4 and no 2 damage anywhere on their playbook, you’re probably not going to expect enemy models to get taken out much. In terms of defensive ability Soma is exactly the same as Smoke – except without Unpredictable Movement, which is a major downgrade. However, Soma has less need to actually be aggressive, so you can get away with lower defensive ability to an extent. Soma’s TAC is lower than Smoke’s, and they’re a lot less mobile, so don’t expect them to score many goals.
Nitro! is a very powerful character play for enabling teammates. It doesn’t give you quite as much raw distance as Lure of Gold – since Midas can Lure a model twice in a turn to get more actual movement – but it’s a dodge rather than an advance, and doesn’t have to be towards Soma. This means you can use it to rescue an engaged and knocked down teammate, and you can use it to dodge multiple models at once to pin in enemies with UM or otherwise shift a fight into your favour. Soma can also use it as a way to get out of danger personally if required – although it’s not very efficient, sometimes you just need the effect anyway. It’s an awkward inf cost, given that if you use it you’ll be wasting 1 influence, but that doesn’t mean it’s bad – just treat it as though it costs 4 a lot of the time.
Raging Fire is a very powerful buff. It’s the only way to increase the damage produced by playbook damage results in the Alchemists, and enables beatdown options that the team otherwise just doesn’t have. The splash damage effect is of less impact, since you need to put Burning on nearby targets beforehand in order to get any use out of it. However, if you do manage to get Burning up on incidental targets first, you get some extra damage for free. Mostly, you’ll want to be putting this on a Katalyst, since they’re the models with the best melee attacks to take advantage of this effect. Soma’s inability to use both Nitro! and Raging Fire in the same turn is inconvenient, especially since you’ll usually want to be loading them up with 4 influence in order to threaten with their Legendary Play.
Burning Spirit is Soma’s defensive tech. It applies a movement debuff when an enemy comes within 2″. This means that if an enemy model with 1″ melee tries to reach Soma, if they have less than 2″ of movement left they immediately stop when Burning is applied and can’t use momentum to avoid it, unlike other effects such as Foul Odor. This helps Soma’s durability a lot, although it isn’t quite as good as Unpredictable Movement. It’s much less effective against 2″ melee models since they can still hit you.
Gimme Fuel… is a +2 TAC buff for anyone who can cheaply and easily apply Burning (like oKatalyst, Kami and Mecrury) and for anyone you’ve put Raging Fire on. This is another high impact rule which is otherwise hard to get in Alchemists – they’re very short on ways to amplify their damage numbers beyond the baseline, and this definitely does that. +2 TAC is good on anyone who buys attacks, although Mercury and Kami primarily benefit if it’s enabling a wrap – +2 on its own won’t do that, so either you’re stacking things up to be wrapping, or you don’t get that much benefit. On the other hand, for those models, the buff is almost completely free, so if nothing else you’re gaining in consistency.
Gimme Fire! lets Soma set up for their own payoff with Burning, and lets you get Pneuma onto the pitch. You only get to let Pneuma out once a game, so make sure you do it at the right moment – preferably when you have a full stack of influence available to spend afterwards. Moving on, Pneuma’s card has a whole bunch of new mechanics on it.
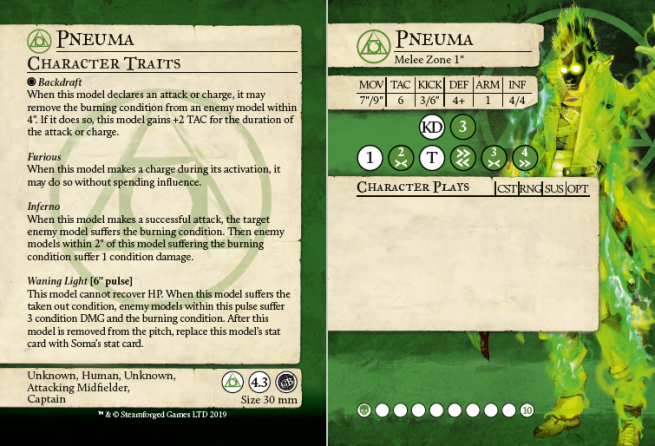
Firstly, Pneuma has 10 HP. This is obviously a big downside, but if Soma was low on HP, you’ve effectively healed up a bit. You keep the 4/1 defensive stats, which aren’t terrible, and got a better counterattack and go very fast. Pneuma’s playbook is terrifying, with a great early m2>< result, a reasonably accessible KD, and a great top end. The 3 damage isn’t that difficult to reach, and if you’re able to get a low-def target or one with some setup already active, then the playbook just gets better from there. Pneuma also has potential to chuck enemy players off the pitch, with an early >< and a column four m>><< that puts Midas to shame. With 4/4 influence, even if Pneuma is doing scary things to the enemy models, you don’t take any inf from the rest of your team. You do, however, lose out on Soma’s excellent character plays – Pneuma isn’t a support model at all.
Backdraft and Inferno are the same as on Soma’s card, only Pneuma doesn’t need to pay inf for Inferno and only gets Backdraft personally, rather than granting it to the whole team. This means your squaddies get a little bit weaker, but in exchange Pneuma is effectively a TAC8 models with a six column playbook full of momentous damage and a permanent Tooled Up effect. This makes for a lot of dead enemy models. It lets you generate three momentous damage on column two, very reliably, which makes for 12 damage (enough to oneround a lot of models) if you just buy four attacks. If you can get to column 4 – not that hard with TAC8 – you’re doing 16, which is enough to oneround a lot of captains.
Furious lets Pneuma do captain-level work despite only having 4 max influence. This means that you can allocate 4 to Soma, be able to Nitro and Raging Fire if you want to support your team, and project a 10″ bubble of potential Pneuma charge range if you decide to legendary. If an enemy is within 10″, Pneuma can charge for the KD, apply Burning for free (and 1 damage), then buy four more swings with Backdraft for 4 damage each, which makes for a 17 hit point burst, even if the enemy has a good counterattack. Effectively, if Soma hasn’t activated yet and has a full stack, then moving up to within 10″ is pretty much not an option unless your opponent is okay with their model being deleted on the spot. Pneuma also has plenty of >< results in their playbook – as well as the usual benefits, this means that putting them in a melee zone doesn’t prevent them from using Furious very well – they can just buy some attacks for m2>< results, shove the enemy out of engagement, and then charge anyway.
Waning Light turns Pneuma back into Soma when they’re taken out, so you only get to use them once per game. With 10 HP, they’re probably going to get cracked by the enemy at some point, but the plan should be to get as much work done as possible beforehand. If you throw Pneuma into the enemy team to get a take out, finishing Pneuma off in response is likely to cause even more damage to the enemy team when they explode, at least to the player who took them out. Pneuma is pretty much definitely not going to last a long time in a fight, so it’s more about making taking them out as punishing as possible rather than trying to actually prevent it, unless you’re using Gimme Fire! as a tool to end the game with. You’re on a definite clock, but the inability to heal Pneuma isn’t really a big deal – they aren’t going to survive an actually threatening activation anyway so 4 HP wouldn’t really save them from much.
Soma/Pneuma are a very strange captain, but they do a lot of very powerful things. While your goalscoring ability is not comparable to that of Midas or even Smoke, you get to make up for it in other ways. There are many squaddies in the Alchemists who are good at scoring goals. There are absolutely zero squaddies in the Alchemists which can replicate Soma’s ability to boost the team’s damage output. In terms of team mobility, Soma is reasonably comparable to Midas, so you aren’t losing much on that front. I feel that Soma is at their strongest when against footballing teams – the ability to oneround an enemy striker who’s in a threatening position does a lot to relieve enemy ball pressure, whether because their models are taken out or because they’re playing more defensively with them instead. Fighting teams also tend to have critical models they can’t afford to just lose as well, though – Pneuma is excellent at going last in a turn, taking someone out, and then going first next turn and going for someone else. This can give the Alchemists enough of an advantage in the scrum to actually take control of a fight. Backdraft is also very relevant for winning fights because the TAC buff increases the odds of wrapping, which means it also helps with momentum generation – as does Pneuma’s Furious. Alchemists are lacking in tools for efficient momentum generation, so this is also a noticeable advantage. The big problem is that they’re just a little clunky – you can’t both buff and speed up your models, and all your stuff (at least on the Soma side) is very inefficient, which means you don’t want to allocate 4 to them often, but at the same time you want to threaten to kill people with Pneuma.
Flask
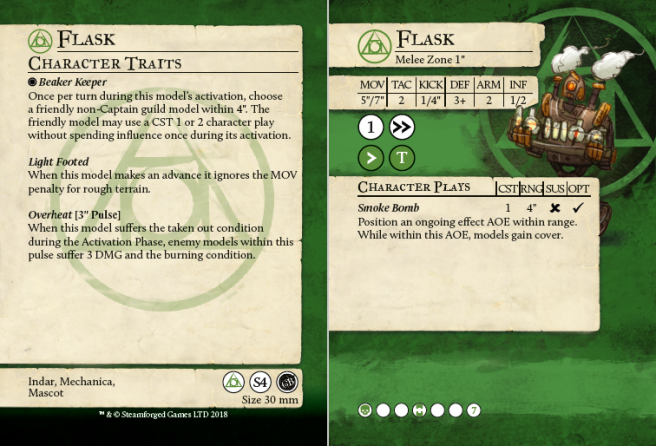
As a Mascot you generally don’t expect them to have much VP scoring potential, and Flask is definitely fitting the mould there. With TAC2 and nothing impressive on the playbook, poor kick stats and 3/2/7 defensive numbers making it killable in one round, Flask isn’t a model you want to be buying attacks with. Generally it’s going to want to stay back far away from the action.
Smoke Bomb is somewhat useful for protecting your models, but its main use is saving a point of INF on Smoke. This is actually a major benefit and helps her a lot – she really wants to be throwing three Infuses so letting her do so is very helpful.
Light Footed lets Flask go wherever it’s needed in your backlines and occasionally retrieve the ball after a kick off, but comes up only very rarely. It’s not a reason to play Flask by any means.
Overheat punishes the enemy for taking out Flask, which is nice because it’s otherwise quite an easy VP. Most of the time Flask is going to be in your back line though, so it won’t often be presented as a target – although occasionally it’ll get tagged by AOE character plays from the enemy or similar. Be aware that it only triggers during the activation phase, so if Flask is taken out by conditions you get nothing. However, occasionally it can be a reasonable plan to leave conditions on Flask or even put them on deliberately – if you can get Flask to a low HP number, you can run your little robot into the fight and then tag it along with the enemies with your AOE character plays for a load of bonus damage and Fire. It doesn’t come up often, but it’s occasionally a useful plan.
Beaker Keeper is the main thing Flask does. Free character plays are great and Alchemists have lots of places to use them. If you don’t get the opportunity to put it on a squaddie before they activate, you can even have Flask use it on itself for a free Smoke Bomb. This trait pretty much lets Flask contribute 2-3 influence per turn to its team which is a great deal for a mascot slot.
Flask is useful with almost all the Alchemists’ squaddies, and particularly effective in a Smoke team, both because of Smoke Bomb and because the defensive lineup is more likely to want to throw lots of character plays rather than be buying attacks. Even in a footballing Midas lineup, though, giving one of your strikers the ability to throw a character play without having to lose out on the attacks they can make is a big bonus.If you’re playing a large number of models which benefit less from Beaker Keeper (Compound, Katalyst, Venin, Union models) then you probably want to avoid Flask, but otherwise it’s always a fine include.
Naja
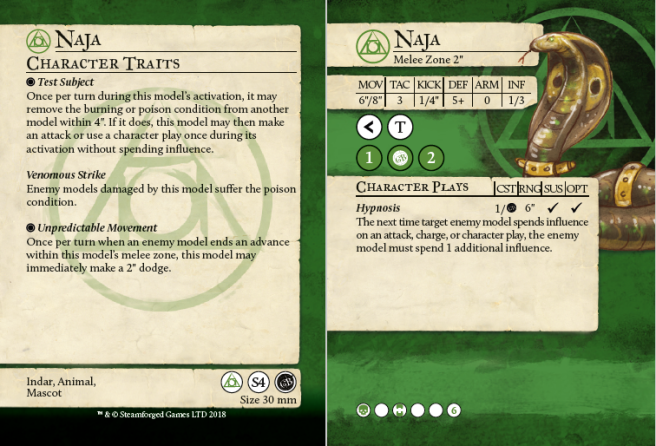
Naja is quick and has a 2″ melee zone, which is nice for applying crowdouts to enemies. While still no good at football, it has an acceptable playbook for momentous damage, which is a useful bonus to have in the Alchemists who don’t have a ton of options for scoring takeouts in melee, so an additional helping hand (or fang) there is great. With 5/0/6 defensive stats and an underwhelming counterattack, Naja isn’t going to survive a dedicated assault, but its high DEF does mean that getting chipped down by character plays is harder to do than it is on Flask.
Hypnosis is a strong character play against a lot of targets, especially if you can get it momentously off the playbook. You’re spending 1 influence (sometimes) to get rid of 1 influence on the enemy team, which is solid as a baseline, but the important thing is that 1 influence on your mascot matters a lot less than 1 influence on some other models. Common examples would be models with Berserk, ball holders which need a specific amount of INF to score, and a lot of 3-max-inf squaddies with powerful attacks, like Scourge and Sledge. It’s also a character play which can be momentously triggered from the playbook and target a different model, which is one of the most efficient ways of cracking Resilience – and Smoke in particular doesn’t want to be dealing with Resilience. Naja is particularly insufferable for models like oBoar and oRage, since applying Hypnosis and then engaging them effectively blanks their entire activation.
Venomous Strike gives Naja a pretty reliable way of putting out the poison condition while generating momentum. Naja’s three column playbook means it actually wraps with a bit of setup, which can actually put out some decent damage while generating lots of momentum. Its attacks still aren’t as valuable as your dedicated beaters, but it’s not a bad place to be putting influence.
Test Subject lets you put Hypnosis up for free if you need it, which is nice, and it also lets you turn a poisoned enemy target into some damage, a momentum, and the poison going right back on again, which is nice and cheap. It gives Naja some efficiency which, while not quite as good as Flask’s contribution, is useful for disrupting the enemy and lets you switch into doing damage with a late activation if you’re forced to activate your squaddies early, rather than losing out on utility like Flask does towards the end of the turn.
Unpredictable Movement makes Naja actually quite durable, since with 2″ melee most models either can’t connect or need to B2B it, which still means you can potentially dodge away and then get another 1″ dodge to disengage on a counterattack. This also means Naja is a pretty good ball holder, since your other Unpredictable models all want to be activating at other times / to do specific things, where Naja is pretty happy to just sit back and keep the ball safe from enemy goal runs. Incidentally, against Fish and Morticians, Naja has an additional advantage over the other UM models as a ball killer, which is a bad kick stat. This makes trying to reclaim the ball with Seduced or Puppet Master much more difficult and unreliable.
Naja is more of a universally useful model than Flask, because it needs less specific squaddies to do its thing, and is less likely to give up VPs unexpectedly. Naja is particularly good into footballing teams for ball holding ability and Hypnosis’ ability to occasionally shut down a striker, but it’s not like the snake is particularly bad into other teams either. If you’re going to play only a single mascot, it should probably be Naja, but there are enough places where Flask is really useful (particularly with Smoke) that running both mascots is also a solid choice.
oCalculus
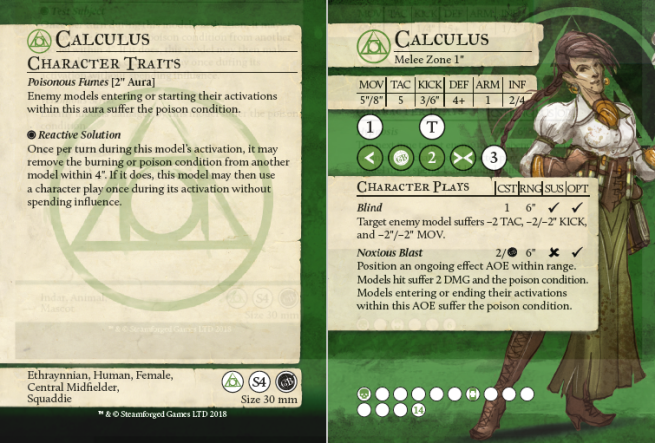
Calculus has a pretty vanilla all-rounder statline, with baseline 4/1/14 defensive numbers and standard KICK and INF values too. She’s quite quick on a sprint, but doesn’t really have the playbook to do anything dramatically interesting with it. She doesn’t tackle till column 3 with TAC5, so she isn’t really a ball player, but her damage output isn’t exactly impressive either – she is more of a utility piece. Speaking of which, her character plays are really the reason you pick her.
Blind is a handy tool to have available. It isn’t really ever going to be completely blanking an enemy’s activation, but it usually does enough to make the target a lot less efficient. The -2 TAC penalty isn’t as good as it seems – except on models that really want to hit the top of their playbooks, like Blackheart or most Brewers – because if you’re within 6″ of the enemy, anyone with a reasonably threatening set of attacks is probably going to cause Calculus problems even if they do have -2 TAC. The -2″ movement is similarly reduced in value because there’s a model within 6″ of them at the point where you used Blind. The Kick penalty is the really impactful part, because the fact Calculus is within 6″ doesn’t matter in the slightest, and taking two dice and 4″ of distance off a goal run really makes it a lot less reliable. Calculus is great at messing with strikers and generally causes them a lot of problems – especially since they are usually low TAC also and can have problems with getting the ball off someone when they have another -2. She’s good at shutting down the enemy kicker when you’re receiving the ball, or messing with enemy goal runs if they’re hoping to score on turn one.
Noxious Blast is also a very handy Character Play. It lets you fuel all your condition-activated effects, and also puts down an AOE Smoke can use if she needs one. It’s a pretty good use of Beaker Keeper, although that trait is best applied to a model which wants to use it to spend more than its usual max-inf in an activation. Noxious Blast is particularly good against teams which rely on armour over defense for durability, or have tough hide, like Blacksmiths, Masons and Brewers. Poison is something enemies will often not clear just because it’s only damage, not a penalty to the model’s actual output, and it’s easy to reapply in Alchemists anyway. Getting it off the playbook is nice, and it gives Calculus a (once per turn) m2 on column 2 with significant upside, which is handy. Calculus doesn’t really want to be in melee very often though.
Poisonous Fumes is a nice free effect that gives out a bit more poison. It only works if the enemy comes to you, not if you go up to the enemy – but that’s fine, because generally Calculus is going to be the defensive model to the opponent’s attacker anyway, and some free conditions or momentum tax is always good to have.
Reactive Solution lets Calculus use a character play for free without needing support from Flask. She’s very efficient, and if you do put Beaker Keeper on her she can use that for a free Noxious Blast, then pull the applied Poison back off again for a free Blind as well, getting a lot of work done with no influence. It’s useful to be able to get stuff done without a lot of allocation when your model has specific times in a turn it’s going to be useful – if you put 1 on expecting to Blind and then don’t get a chance to activate early, for example, that inf is pretty much wasted – but if you allocate 0 and use a condition to do whichever is required at the time, you can put that influence somewhere it’ll be more useful instead.
Calculus is an efficient and versatile player. She has access to the single best control tool in the guild in Blind, which is very good in a team which wants to play keep away and avoid enemy models playing an aggressive game. Her defensive focus and controlling plan makes her a more obvious fit for Smoke than Midas, but every Alchemist team can appreciate a model which needs no influence allocation and which helps to shut down high threat enemy models, so she can show up in most teams really regardless of captain.
vCalculus
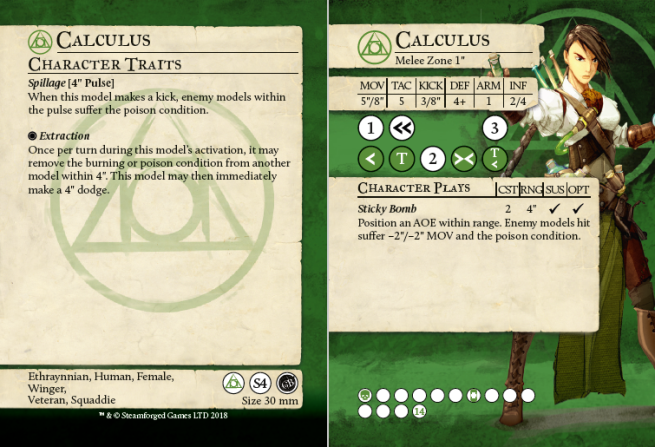
Veteran Calculus is definitely feeling a bit more proactive than her original incarnation. She’s no better at combat – in fact, her 2 damage result is no longer momentous – but her tackle has moved down to column two (which is a major bonus and makes it actually reachable). She’s also gained 2″ of KICK distance, which is a big bonus and really helps her goal threat a lot. If you can reach it, she’s also now got a mT< result on her last column, which while difficult to reach is a nice bonus for spikes. Her counterattack also got a bit better with a new << result on her second column.
Sticky Bomb is sort of a merger of Blind and Noxious Blast. It doesn’t shut down anywhere near as much stuff as Blind does, but it applies conditions for the team (and Calculus) to use, and the movement debuff is nice for preventing snapback goals after you’ve scored. AOE movement debuffs are always pretty impactful, especially when on a team which also has plenty of access to the Burning condition.
Spillage, like Poisonous Fumes on oCalculus, puts more Poison out on the enemy effectively for free. It’s mainly relevant when taking Shots, but occasionally you’ll need to pass the ball around while next to enemies, even if it isn’t exceptionally frequent. Like Poisonous Fumes, it’s not something which you really care about or that comes up very frequently, but it’s nice when it happens.
Extraction is a very useful effect and the main tool Calculus has that makes her actually good at football. It’s not hard to find a condition to pull, and effectively gives vCalculus a 13″ threat range on the ball, or a very easy disengage which – importantly – doesn’t cost influence. This makes her a pretty reasonable kick off model and a good opportunistic goal scorer. Because she wants to be running after the ball but also has a useful character play, she’s a pretty good Beaker Keeper target, letting her put out Poison to enable Extraction without spending any influence to do so. If you don’t have Beaker Keeper up, you can also use Extraction and Spillage as a sort of budget, unreliable Where’d They Go? if you need to disengage by kicking the ball to space, applying Poison with Spillage, then using Extraction to dodge and pick the ball back up again. It’s not exactly optimal and a bad scatter could be a real problem, but if you’re choosing between that and failing to get a goal you’d probably go for it.
The biggest downside to Veteran Calculus is that you can’t play her with Original Calculus. Blind is a very powerful tool and there isn’t really anything else like it anywhere in the faction. vCalculus is a pretty solid striker who does plenty of work – however, as we’ll see, in terms of models to run at the ball and try to put goals in, the Alchemists have a lot of choice already and can run a striker captain and at least two other footballing focused squaddies without needing to ditch oCalculus to do so. They also have several other options for kick off pressure. Veteran Calculus does bring a few cool things to the team however – mainly, Sticky Bomb (especially off Beaker Keeper) lets her score goals herself while also contributing to the denial / defensive playstyle which Smoke leans towards. Because Extraction gives her a second movement ability beyond her jog, she can also throw out poison on the enemy from a safer distance than oCalculus, since oCalc needs to be within 7″ to tag an enemy with Noxious Blast while vCalc can do the same, but then afterwards use the Poison or Burning conditon on an ally to dodge back out to 11″ away while applying a movement debuff.
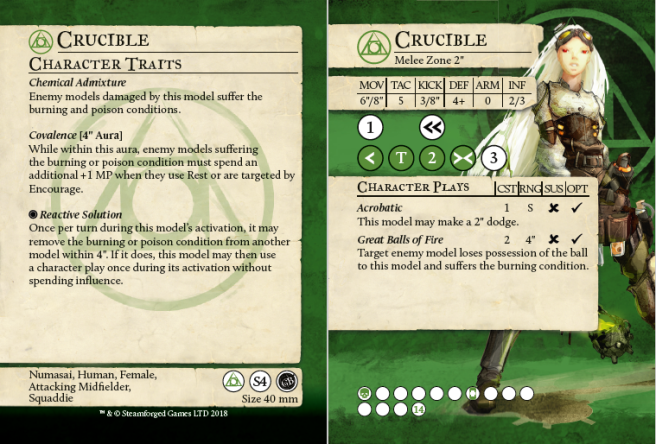
Crucible is fast and has great kick stats, but has a 3 influence cap and is pretty bad defensively. Her counter attack is pretty underwhelming, and at 4/0/14 she’ll die to a stiff breeze if the enemy actually connects with her using any dedicated damage dealer. However, with a mT on her second column and a (rare in Alchemists) 2″ melee zone, she’s pretty good at grabbing the ball, and with her 8″ kick she’s also pretty good at putting it in the goal once she’s got it. Just don’t expect for her to survive for long afterwards.
Acrobatic puts Crucible’s inbuilt threat range up to a solid 12″, although if she buys Acrobatic and a Charge she isn’t going to have any influence left to shoot afterwards if she tackles. Fortunately there are several sources of free character plays available, so she does have the option of taking that line. It’s not something you’ll use every activation but it’s distance if you need it which is nothing to complain about.
Great Balls of Fire is a really useful character play, particularly for teams with a footballing bent like Alchemists. They don’t have any other reasonable ways of getting the ball off a Close Control model, so being able to just take it without worrying about counter attacks or most defensive traits is a big deal. Again, its inf cost and Crucible’s inf cap mean that you won’t often be buying it directly, and instead want to be using it for free. The Burning is just a nice bonus really, but not why you’d use the ability. Note that while GBOF is great for snagging the ball off Close control targets, it is OPT and so it doesn’t do much at all against enemy models with Resilience or similar effects, which are pretty good counters to Crucible.
Reactive Solution gives Crucible the ability to actually reasonably pay for Great Balls of Fire, or have a free Acrobatic if she doesn’t need to be stealing the ball from someone or can do so with a Tackle. Crucible isn’t quite as good as most of the Alchemists at actually applying the conditions to enable Reactive Solution, but she can still do so if she absolutely has to, though usually you want to set up with someone else to help her efficiency. Note that Reactive Solution does not demand the Character Play be used immediately – this means she can pull a condition from someone, then sprint/charge to somewhere else before using Great Balls of Fire to steal the ball for free, which is very important.
Chemical Admixture gives Crucible a way to apply conditions on her own. Her damage isn’t momentous until you reach column three (with TAC5), but this does – if needed – effectively let her use Great Balls of Fire for 1 influence if she has someone she can attack and deal damage to safely, and on a charge she can often deal her momentous 2, to steal the ball while generating the momentum to shoot with without needing support.
Covalence is not something which plays into the football game anywhere near as much as the rest of Crucible’s abilities. It’s also not as useful as it first appears, since if Crucible is within 4″ of poisoned/burning enemies, they don’t need to clear conditions to engage her, and can just kill her and clear the conditions later. However, there are a few exceptions. Mainly, Covalence is enormously better when it’s applied to enemies who are knocked down (and also on fire or poisoned, so the aura actually applies). KDs aren’t easy to come by in the Alchemists, for good reason, but if you are able to set some of them up you can really mess with your opponent. If you can get Crucible to end a turn unengaged with enemies in the aura, and then spend the first activation of the next turn KDing some of the enemies within it, they won’t be able to clear the effect immediately and so can and up entirely stuck or at the very least forced into a very awkward order of activation. Be aware that it doesn’t do anything if they have some alternate method of clearing conditions, like Smelling Salts or similar. While Alchemists usually don’t care much about these conditions (it’s real easy for them to just re-apply poison and burning), Crucible in particular isn’t very happy to be dealing with them. She’s still good even if Covalence literally never does anything, though.
Crucible is a great aggressive goal scoring model. She is very useful to a lot of football focused lineups because as mentioned above, she is the only real answer to Close Control models in the Alchemists’ team, short of just tackling them twice. She also has the uncommon benefit of 2″ reach. Her main failing is how flimsy she is. While ball killing teams don’t like her, the faster takeout focused teams which kill the ball less well – like Butchers and Falconers – will make short work of Crucible and punish her poor defenses easily. Crucible doesn’t really play into Smoke’s defensive / stand off game plan much, although she’s still relevant as a striker if you need that. She’s very nice when combined with Katalyst in particular since he’s the best model in the guild at applying those KD + posion/burning combined conditions to make Covalence as insufferable as possible.
Kami
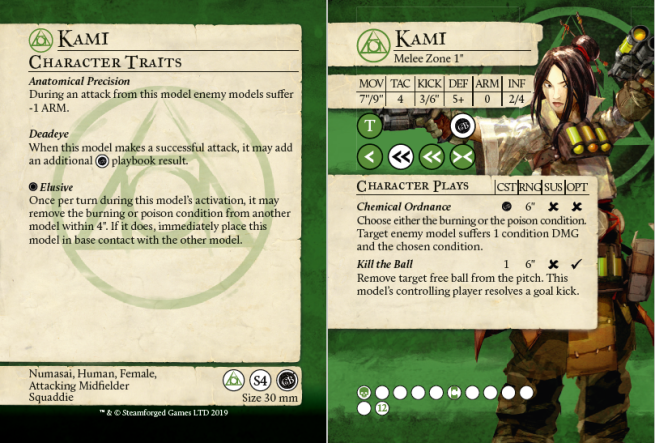
Kami is focused on football, and her playbook immediately cements that. She has a tackle on column one and great access to movement, but absolutely no damage results anywhere. She’s not super durable at 5/0/12, especially with a 1″ melee zone weakening her counterattack, but she is very fast. TAC4 is somewhat underwhelming, but it does mean that charges have potential to wrap, with a bit of help, which gives her potential access to a T<< or T>< result.
Chemical Ordnance doesn’t directly help Kami do footballing things, but it does have impact – while it isn’t easily accessible on her playbook, Deadeye gives you a shot for free whenever you attack. Like a lot of Alchemists, this means that Kami gets to put damage and conditions on enemies without actually dedicating resources to it – she just does so incidentally while she’s doing her own thing. Because she can apply Burning for free on every attack, she benefits well from Backdraft, letting her wrap more reliably in a Soma team. While it adds free damage to every attack, Kami still isn’t exactly an output model if the ball isn’t in play – however, she is quite consistent at applying 3-4 points of chip damage to a target, if they’re low, and she can do so at quite a long range between her speed and the additional distance on Chemical Ordnance. This can be useful for finishing off enemies, especially since it bypasses Tough Hide. It’s also very useful for breaking through Resilience for ‘free’ – while generating momentum – which is handy when the Alchemists have a lot of ranged character plays and limited other ways of getting through it without burning something more useful.
Kill the Ball is a good tool to have available, and makes Kami a good counterpart to Crucible. Crucible is great at retrieving a ball from enemies who are holding it – meaning the obvious counterplay is to drop the ball. Kami gives you a way out in that scenario, letting you retrieve the ball anyway amd get it back into a position where you can threaten to score. She can also use it if she’s holding the ball and under pressure from the enemy – drop it and then Kill it – if you just need to move it a long way to the opposite flank of the pitch. It’s definitely not a play you’ll use every game, but it has an impact when it comes up, and its presence on your card influences the way your opponent plays the game for free.
Anatomical Precision is important for Kami because her low TAC would make armor a pretty big problem for her otherwise. This means that she’s still reasonably likely to hit her << result if she needs to reposition, and it also makes the odds of her completely whiffing very slim. This is particularly important for Kami because Chemical Ordnance only applies to successful attacks, so getting zero hits would be particuarly rough for Kami.
Elusive is a powerful and long ranged reposition. Because Kami only needs to be within 4″ of one edge of a model, and can place on the other side, this could be around a 7″ move for zero influence invested, if there’s a 50mm model in the right place. Naturally, most of the time a model won’t be perfectly placed, but you can use Elusive on your own models as well as the opponent’s, so bouncing off Katalyst or Venin on turn one is a definite possibility. It’s also good for engaging Unpredictable models or getting out of dangerous situations. Kami functions slightly differently to most other Alchemists in that she can pull conditions, but not from herself – placing her B2B with herself would be tough, after all – but that means that if you have a choice of allies to pull conditions from with other models, it should often be Kami, since she can’t use it as ‘fuel’ like other models can.
Kami is a ball chaser, which isn’t exactly uncommon in Alchemists. However, she has several upsides over the competition. Elusive makes Kami’s threat very nonlinear, letting her get past a lot of potential ways of disrupting a goal run, and the sheer distance she can travel is also very high. Unlike Crucible, Kami also has respectable defensive stats, which means if you’re not using her for a goal run you don’t have to spend the turn hiding miles away from any enemy models if you want to avoid giving up free VPs – which in turn increases her effective threat, because she can be moved into threatening positions without immediately getting taken out. She is also a character who can do things without needing any pre-existing setup – she puts conditions out on the enemy, without needing them to be already present before she goes in. This makes her a good first activation and a model that’s difficult to make useless or disrupt, compared to some of the Alchemists who sort of want an enemy to already be conditioned or set up before they commit to doing their thing.
oKatalyst
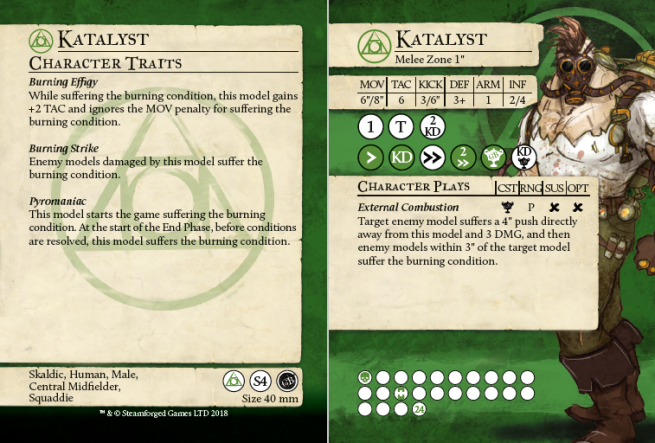
Katalyst is very different to most of the other Alchemist players. He’s got much worse defensive numbers than the rest, at a worrying 3/1, but with 24 hit points he still isn’t going to get one rounded any time soon. He’s only got 1″ melee, but is surprisingly fast for a big guy with his 6″/8″ MOV stats. His 1″ melee is also compensated for somewhat, since a model with TAC6 and an easily accessible momentous KD result isn’t worried much about counterattacks. He also has a lot of momentous pushes in his playbook and a great 2KD result on column three, which we’ll get to later. He’s not bad at football too – although that is a time when he’s worried about counterattacks, he has high TAC, a reasonably accessible T result, and standard KICK stats, so if you need someone to grab the ball off someone who isn’t a dedicated ball killer and chuck it back to Midas, he can do the job fine. Katalyst’s counter attack isn’t particularly relevant because his defensive stats make him easy to KD, but if he’s facing down someone like Fillet or Jaecar he has a reasonably accessible >> on column three as well as his KD.
External Combustion is a useful character play mainly because it gives Katalyst an effective m3 result on column five, which is pretty accessible for him. It also happens to set multiple enemies on fire when you use it, which is a nice bonus, and chucks the enemy away. This means that you can walk up to someone, KD them, hit them a bit for some Combustions (declining to push them out of your melee zone initially) and then on the last swing, push them the full distance, leaving them pretty badly damaged, knocked down with nobody in their melee zone and on fire, preferably next to Crucible so they can’t immediately stand back up again. He can even do the above on just one attack if he reaches column six. Note that you have to do the push before you have them explode and set everything on fire, so you can’t apply burning to other nearby models before kicking your target away. It’s also reasonably useful for throwing a model that just returned to the pitch straight back off again – if you’re in range, it’s not unlikely to get results of mKD into m2>> into External Combustion for a total of 6″ of push (depending on how Katalyst is positioned) to get a quick unexpected repeat takeout.
Burning Effigy makes Katalyst effectively TAC8 all game. The exception is if the enemy knocks him down – since spending MP to clear conditions clears them all, you lose the Burning effect and just are TAC6. Then again, with his early KD, Katalyst still does useful things even if Burning Effigy is not active. It’s not like the 1 damage really matters – Katalyst has plenty of HP, and if he’s going to die it will be to huge chunks of damage as a result of his low defensive stats anyway. It’s also useful for using condition-fueled abilities like Extraction and Reactive Solution without needing to be near the enemy team – especially on the first turn.
Burning Strike lets Katalyst set up for Crucible nicely even without reaching External Combustion, with the 2KD result on column three also applying Burning. It also makes External Combustion actually set the target model on fire twice, as well as all the other models in the pulse once, since they take Burning once from the damage itself and again from the pulse (since the model is within 3″ of itself). This isn’t super relevant but occasionally comes up if the opponent has an effect that lets them ignore the ‘next condition’ such as Cocksure. Burning Strike also means that oKatalyst can enable himself with Backdraft without needing to be the target of Inferno, which helps out with activation order and lets you put Inferno on someone else.
Katalyst is a great include in the team but has some downsides. He only really does anything if he’s within 1″ of the enemy, which is a real issue for a model with bad defensive stats. It takes him a while to die, but he’ll give up lots of momentum while doing it and some models can still one round him, especially since he doesn’t get to counter attack often. He is pretty good at tying up enemies and forcing them to deal with him, though – this isn’t really a good plan for a defensive Smoke list but is nice if you just want someone to keep the enemy busy while Katalyst’s teammates score goals. He also really appreciates a secondary damage dealer as support – he isn’t really going to get takeouts on his own, but he does do a reasonable amount of damage, and a second takeout focused model lets him actually score VPs more reliably rather than being primarily a roadblock. Crucible supports what he does well with Covalence, but she doesn’t actually provide damaging support for him very much. He benefits a lot from Soma’s presence in the team, but so does his Veteran version, as we’ll see.
vKatalyst
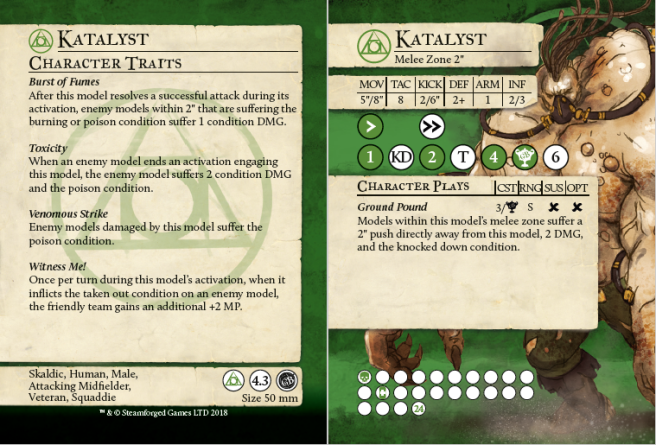
vKat is bigger, badder and TAC8 all the time rather than just most of the time. He’s also incredibly flimsy, however – even compared to his original incarnation. Veteran Katalyst has a highly worrying DEF2/ARM1 statline while bringing the same HP stat of 24. His counter attack is reasonable, with a >> on column 3, but he’s very easy to knock down. He’s a lot worse at playing football and caps out at 3 influence, too. So what are his upsides? Well, primarily, he brings damage and plenty of it. He is TAC8 with a 7 column playbook (still harder to wrap with than oKat though), and has a momentous 4 damage result on column 5 and 6 damage on column 7, which will kill a lot of models pretty quickly if he has some setup. If he’s off on his own (and miraculously not taken out), he still has a column 3 m2 result to tag enemies with reasonably consistently. He’s also a damage dealer with a 2″ melee zone which is entirely unique in the Alchemists and helps him a lot with avoiding counter attacks and giving him a solid threat range. He keeps oKatalyst’s easy KD, which helps him bring a bit of utility. Because he has a playbook with excellent damage all over it, he benefits greatly from Soma’s buffs – he doesn’t put Burning up himself, but Inferno amplifies his damage and lets him use Backdraft.
Ground Pound is pretty difficult to justify spending the INF on, and hard to reach on the playbook at column 6. However, like with oKatalyst, KD effects are somewhat difficult to find in the Alchemists and even better, this one hits automatically. Sometimes walking up to enemies and buying Ground Pound can do a lot of work, but be aware that Kat is probably going to die soon afterwards, so whatever work you’re getting done had better be good. Sometimes you can get a good start to a turn by using Ground Pound to KD multiple influence carrying models and put them in a position where they can’t get back up, but it’s difficult to do so in such a way that they don’t end up clearing conditions and killing Katalyst. If you do spike a roll and hit the Ground Pound, you get to do a lot of damage on everyone nearby, which can incidentally take out other enemies as well as his initial target.
Toxicity is just free damage. The enemy is probably going to need to engage and kill vKat at some point in the game, since he’s a big enough threat that he absolutely can not be ignored. Getting a bunch of free damage is always nice in this situation, though it probably isn’t enough to make you happy with the scenario, it helps to wear the enemy down and put them into positions where when Kat inevitably gets taken out, he’s coming back on onto a board full of poisoned models on half health, who he can trivially oneround.
Venomous Strike makes Ground Pound and Katalyst’s playbook apply poison. This means Ground Pound sets up for Crucible very well, and it also means Burst of Fumes effectively ups his damage results by 2 except on counterattacks and parting blows. He’ll pretty reliably apply 12 damage to whoever he goes for, and if you can set him up to reach his 4 then suddenly 18 is very doable. The fact Burst of Fumes applies to everyone in his melee zone is nice, but it only matters if you’ve already hit the Ground Pound, usually.
Burst of Fumes makes Katalyst deal 2 damage on column one, and 3 damage on column three, meaning he can be reasonably expected to almost oneround most squaddies in the game if the poison damage ticks as well. This is very important, because there aren’t that many other damage threats available to the Alchemists, so Katalyst is often the only person actually buying attacks for the purpose of getting takeouts.
Witness Me! gives you a bit more MP for committing Katalyst and getting a takeout from him, which is useful and quite important, since you just put a DEF2 model into a fight so most likely your opponent is going to be getting a lot of MP back themselves in the near future. Be aware that like Burst of Fumes, it doesn’t work on out-of-activation attacks like counters and parting blows, so if you get a takeout there you get no benefits. Not that vKat is going to be making either often, since he’s easy to KD and easy to disengage from.
vKatalyst is a scary threat. He’s at his best when he is being enabled by his captain, since mobility benefits are very good for him – he really doesn’t want to be spending 2 of his 3 max-inf on a charge. As such, Midas and Soma both enable vKat well. Midas is great at moving Kat around, and provides a goal threat. This is good because vKatalyst is a giant distration that demands the opponent’s attention, which frees up your strikers to spend the rest of your influence scoring goals. It’s very difficult to protect against vKat while also protecting the ball from the Alchs’ excellent footballing squad. Alternately, Soma enables Kat in a different way – you still grant him mobility, but then follow it up with additional damage through Backdraft and Inferno. This turns vKatalyst from a scary damage dealing into a model capable of taking on whole teams at once – with Inferno online, a TAC10 vKat isn’t that unlikely to spike to Ground Pound – and if he does, he’s doing 4 splash damage with that attack and another 2 with all future attacks, which when combined with poison and burning can incidentally take out models you never even targeted. Since he’s often fulfiling a different role to the rest of the team, you should be careful not to let him get isolated. He’s not tough enough to survive an enemy dmaage dealer except by killing them first. Be particularly wary of models with playbook triggered AOE character plays like Gutter or Fangtooth, since his low DEF can be capitalised on well by these models and used to take out your whole team.
Mercury
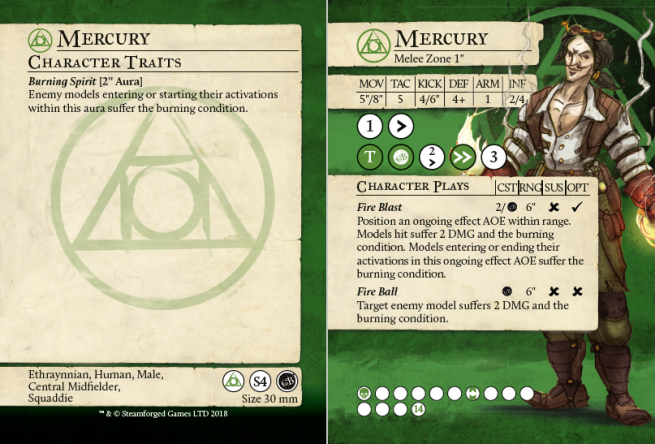
Mercury has a similar set of stats to Calculus, but is noticeably better at football with a nice momentous column one tackle and a 4 die kick. He doesn’t really have any ability to deal with anti-football tech like close control, good counterattacks, or unpredictable movement, but if the opponent is using the ball for movement, or just isn’t respecting the football game much, he can get opportunistic goals pretty well. The rest of Mercury’s playbook isn’t great – he doesn’t have a very good counterattack – but he does have a momentous GB on column two, so let’s get to that.
Fire Ball is a great character play and effectively gives Mercury a momentous 2 damage on column two. It also can be applied to someone within 6″ that isn’t the person Mercury is actually attacking – so if there’s a lower def model available he can consistently apply 8 damage even to a high def target which is great. It’s also particularly good if he can wrap – if there’s an enemy low def model that you can get a couple crowd outs and a KD onto, Mercury can potentially deal 16 to anyone nearby which is pretty impressive. Because you get to pick your targets, you’re nowhere near as bothered about Tough Hide as a model with a standard m2 result. The Alchemists don’t have a ton of setup tools, but it’s not like Mercury is bad even without setup, so that’s probably fine.
Fire Blast gives Mercury things to do even if he isn’t punching people, while also making him a good target for Beaker Keeper. It’s also reasonable for Smoke to jump into – although you’d prefer to teleport somewhere which doesn’t give you -2 movement, given the choice. Leaving a fire AOE in front of an enemy means they take the Burning condition as they move rather than beforehand – this means they can’t clear with MP until after their advance and so get less opportunity to reach you. Sometimes you just want the damage, though. Fire Blast’s 6″ range means you can apply fire to a model up to 9″ away which is a pretty good distance and often means they can’t try to tag you back even if they clear the condition.
Burning Spirit is a nice bit of free conditioning in the same way as Noxious Fumes. However, because it applies Burning instead, it beings a movement debuff. This means that if an enemy model with 1″ melee tries to reach Mercury, if they have less than 2″ of movement left they immediately stop when Burning is applied and can’t use momentum to avoid it, unlike other effects such as Foul Odor. This is a pretty big deal and helps Mercury’s durability a lot. It’s much less effective against 2″ melee models since they can still hit you. Burning Spirit doesn’t apply if Mercury walks up to an enemy, only if they walk up to / are pushed into him (or start an activation near him). Not that people close to Mercury are going to avoid being on fire for long, anyway.
Mercury is not a complex model but he does a lot of useful things. He’s one of the players that goes pretty well with everything – if you’re sitting back and throwing damage he does that just fine, if you’re fighting he’s a pretty good payoff for the setup your team has, and if you’re playing football he’s capable of doing his own thing and getting takeouts while also being an opportunistic goal threat. He’s also a Beaker Keeper target which is useful, and he’s one of the Alchemists that puts out a lot of conditions on the enemy while not actually consuming them himself which is nice too. It’s good to have a model that can fight but doesn’t have to be in a fight to be useful, and that’s what Mercury is a lot of the time.
Venin
Venin matches up to Mercury and Calculus, with a bit less HP but a faster Jog. He’s also pretty reasonable in combat (for an alchemist) with some solid momentous damage in his playbook if he can reach it. He’s only got a 1″ melee zone and no real counterattack, though, and he has no ranged plays, so he needs to be pretty good in melee to do very much.
Acid Rain is a nice play to have occasional access to, but it’s on the same column as Venin’s momentous 2 damage result, and he has Venomous Strike, so it’s only relevant if there are other enemy models within 3″ of Venin. Venin generally wants you to have already applied poison with other models instead, but this is a nice backup plan if you didn’t get the opportunity.
Debilitating Strike makes Venin actually really quite a good damage dealer. At TAC7 with a 5 column playbook, it only takes a little bit of support before he starts wrapping, and he’ll reasonably expect to hit his m2 consistently and his m3 pretty well also. He’s one of the better ‘payoff’ models in the faction – not least because since he wraps better than most others in the faction (similar to Katalyst, slightly more easily but no KD of his own) he is one of the better models at generating momentum.
Secretion and Melting Body make Venin one of the most durable models in the Alchemists at DEF4/ARM2, potentially in the game as a whole. Very few models have baseline defensive stats better than the standard 3/2, 4/1 or 5/0. He needs to take poison to do so, but you can always just pull it back off again with one of your other models at the end of the turn. This helps Venin avoid getting counterattacked (important for an entirely 1″ melee model with no way to re-engage) and lets you play more aggressively with him than you would otherwise. Secretion, like Katalyst’s Burning Effigy, also lets you bring a condition with you on your own team, which is useful for fueling abilities if you aren’t near the enemy team or want to use the condition-fueled stuff to engage.
Coagulation makes Venin’s damage definitely some of the best in the guild, letting him finish off models or just whittle down multiple enemies for free. Note that unlike Smoke’s legendary, Coagulation doesn’t work on models which are only Burning, and it is only a 3″ pulse, so it’s a bit harder to apply to multiple models. However, it’s a very low cost effect, and Venin’s good defenses make him pretty happy to get stuck in there and do some damage.
Venin is a model that wants to get into a fight, and doesn’t really play football that much, instead focusing on the takeout game. He also likes a little bit of setup – because he brings no KD or def debuff, against a 4/1 model then even with Debilitating Strike he still isn’t super likely to start reaching his momentous damage. On the other hand if you can get him going, he does plenty of good work and certainly kills people well for an Alchemist. He works well with Katalyst to set up for him, and preferably also someone who can apply Poison to make him fully TAC7 rather than having to make his first attack at TAC5. The Alchemists are never going to be ones to outfight a dedicated beatdown team, but they can sometimes outfight the more middle of the road teams, and Venin helps with that. He’s also not bad at just getting into fights even if you’re going to lose, because he takes a while to die (4HP heals are also stronger on models with better defensive stats) and can keep enemies busy while your goal scorers do work.
Vitriol
Vitriol is a footballer, and her card shows that immediately. She has a 4/8″ KICK which is otherwise only present in the Alchemists on Midas, along with excellent MOV stats, a 2″ melee zone and a first column momentous Tackle. She’s not exceptionally durable at DEF5/ARM0 with only 11HP, but she has a great counterattack with a second column ><. The only downside of her statline really is her 2/3 INF stat, which limits her ability to actually go in for a ball and steal it before shooting.
Clone is a useful character play for a variety of reasons. Primarily, it lets Vitriol steal the ball without worrying about counter attacks. She can also use it to prevent Parting Blows which is handy, or just put it up before shooting on goal to make the enemy’s ability to kill her slightly lower. If the enemy misses completely, Clone isn’t consumed, which means with her DEF5 using a character play to break Clone can also be quite risky. It’s also available on the playbook – even if her >< result won’t get her out, there are some times when Clone on a counterattack can make an activation which the opponent was expecting to result in a takeout leave Vitriol alive instead. It’s particularly good against enemies which want to charge, get other effects on each attack like Berserk, or rely on KDs to avoid good counter attacks. Clone also works on AOE character plays unlike Resilience, because you just need to be ‘hit’ – it doesn’t have to be one that ‘targets this model’. Buying Clone with influence isn’t something Vitriol can afford to do often – she’s either going to want to take it off her playbook (wrapping on the charge to tackle + Clone is particularly nice) or put it up with Beaker Keeper – which incidentally is really good on her for this reason, since Vitriol is a model that benefits from her character play almost every turn, and really wants to get it for free since she’s quite influence hungry.
I’ve Been Burnt Before.. gives Vitriol a free charge which makes her probably the best kickoff pressure model in the faction. It lets her spend an effective 5 influence in an activation, while also giving the team more influence efficiency, and lets her threaten the ball at a long distance – even if it’s just outside 11″ she can use her >< result to gain a bit more distance. If you want to use it on turn one, though, you need some way of getting a conditioned model within 4″ of her. This is somewhat difficult to do on an enemy model – the Alchemists’ models which can do so for free are oKatalyst and Venin. Fortunately these models are both really good and you’re usually happy to take at least one of them. You could also use a character play like Fire Blast on your own model if you really need to get it set up and don’t have the above two players for some reason, but usually I wouldn’t plan to do so.
Face Your Fear lets Vitriol fuel her own free charge if she needs to. A charge will pretty much always generate momentum, so it isn’t exactly costing you anything to spend an MP on her heroic if it lets you do so. You do still need to be unengaged – a usual line for Vitriol if she starts her activation engaged would be to make a few attacks for the >< result to get disengaged, Heroic to apply some conditions, then pull one of those back off again to charge someone else, or the same model. Incidentally, if you can reliably reach her >< result, she’ll still have 1-2 influence left for a potential shot after her charge, making her good at threatening the ball in this scenario too. Hitting that >< isn’t guaranteed on a TAC5 model, though, and be aware that if you don’t get it you’re probably in some trouble. Failing to disengage with Vitriol makes her very unhappy – she really likes playing against models with bad defensive stats like a lot of Farmers and Brewers – it’s not like she cares about Tough Hide much.
As implied above, Vitriol is at her best when you use her to kick off with. She’s a great model to pressure the enemy with in this scenario, especially when you can follow her up with another squaddie via Lure of Gold (with Midas) or with Smoke. She’s also not bad at holding a ball herself if you don’t want to score just yet, like if you’re trying to avoid a snapback goal against other footballing teams. Vitriol isn’t quite as amazing when you’re receiving, but she’s still a solid striker. She does put pressure on your roster selection because she wants oKatalyst or Venin in the lineup, but it’s not usually a problem because those models are just good on their own. Be aware that using Lure of Gold to bring someone into range on turn one lines up slightly awkwardly with I’ve Been Burnt Before.. since if you bring Venin up, he doesn’t actually bring a condition immediately and needs to activate himself to put it up. If you bring Katalyst up, you can pull the condition immediately but then Katalyst’s own threat is reduced quite a bit since he doesn’t get the +2 TAC bonus. You don’t usually need to Lure of Gold immediately though – the line with the best payoff is probably to walk up whichever condition donor you aren’t planning on actually threatening with t1 to fuel Vitirol, and using Lure of Gold on the other one later. Of course, this does slow you down slightly, so sometimes if you want to go as fast as possible you’ll want to just Lure Katalyst up so you can do as much as possible straight away, or even charge in with Vitriol first activation without IBBB up at all, since if you can reach the ball carrier to tackle and be within 8″ of the goal you don’t actually need more than 3 influence anyway.
Compound

Compound’s numbers are noticeably below average. He’s not great at football (though he does have a second column mT> and a 2″ melee zone, so he isn’t bad at grabbing the ball) and he doesn’t really do very much else, with underwhelming damage and low speed for an Alchemist. He isn’t someone you really want to allocate influence to, at least to make attacks with.
Horrific Odour is a great footballing denial tool. It makes tackling the ball and then shooting on goal a lot less of an option for any non-captain player, since it would cost a minimum of 3 influence to do so, or 4 influence if the target has a relevant counter attack. It does cost a point of influence and Compound’s activation, however, which means you only really want to put it up if you’re expecting a goal run in the near future. It’s very good on turn one for messing with the kicking model’s options, or if you’re expecting a receiving model to score from the other end of the pitch. The main counterplay option your opponent has is just to stay outside 6″ of Compound, so positioning him well and keeping the bubble over all the positions which the opponent could shoot from is important. It does work on passes as well, though this comes up a lot less often. Sometimes you can completely kill a ball though – if a ball carrier planning on a shot or pass only has 1 influence, engaging them with Compound and applying Horrific Odour severely limits their options for getting that ball to anywhere useful.
Noxious Death penalises the opponent for taking out Compound. It’s not going to come up often if he’s sitting back and protecting the goal, but it makes him a lot more useful in a fight. He’s going to take a while to actually get taken out, has 2″ melee, and is pretty good at just getting in the way of the opponent, so in a brawl he can be very useful. He isn’t often going to get influence or make attacks, but he’s good at blocking charge lanes and otherwise being annoying because the opponent really doesn’t want to focus him. If he’s been taking some damage from the enemy, be aware that Noxious Death is like Overheat and doesn’t work if he dies to a condition, but does apply if you take him out yourself with Fire Blast or something. You can potentially set up a chain reaction killing both Compound and Flask for an 8+ damage Fire Blast if you get the opportunity, though you’re giving up 3VPs to do so, if they were going to be taken out anyway you get to deny the opponent some momentum and put plenty of damage on them. Because Noxious Death is a trait, it ignores Tough Hide, and so does the poison damage, which really can put a dent in an otherwise durable model.
Resilience makes Compound actually durable, at least from anything that isn’t a dedicated beatdown. He has enough HP that he needs someone to actively focus on killing him, and ignoring the first swing makes him a pretty underwhelming target to be going for. It makes killing Compound across a turn line particularly bad, since you need to break Resilience twice to do so. It also means that Compound gets a lot of opportunities to counter attack, helping him to disengage himself or keep himself alive. He’s also a pretty good ball holder, especially since anyone planning on tackling him is definitely in range of Horrific Odour. It also works on ranged character plays and on results that aren’t tackles, such as Ball’s Gone!, a KD, or just an attack which would wrap to multiple Tackle results. Once Resilience has been popped Compound is a lot more vulnerable, so take care at that point – cheap ranged character plays, especially ones which can be triggered off the playbook like Marked Target, are particularly good at doing so.
Rush Keeper is an extremely strong zone control ability and punishes some teams really hard. It’s particularly good in teams which have a lot of ranged damage like the Alchemists, since you’re very good at forcing the enemy to come to you to avoid being bombarded with character plays. While it’s naturally good at preventing goal runs, strikers often have ways of getting around it with dodges, or by making long distance shots from outside the aura. It’s fighting teams that Rush Keeper is particularly relevant against, since they still want to come in close to you, but often don’t have as many dodges to help them get there, and don’t have the threat range to just end their movement within 2″ of Compound himself to prevent the charge. Rush Keeper also interacts well with Resilience since it makes it a lot harder to push Compound outside 4″ of the goal, knock him down at range or otherwise disable its effects. Against most opponents Rush Keeper will never actually trigger, since they will take lines of play that avoid it – instead, it costs them a lot of clock time to work around it, which is still a real advantage. If someone ever does trigger Rush Keeper it’s usually a big problem for them. At a minimum, they’re getting an additional crowding out penalty applied to whatever it is they’re doing. 1″ melee models often find themselves with nobody to attack, and 2″ melee models are in a similar place if they didn’t move into base to base with their target, since on the charge Compound is pretty likely to reach his >> result. The KD isn’t that much harder to reach on 9-10 dice. Remember that often Rush Keeper is caused by someone moving into engagement with an Alchemist, which means Compound gets an extra Ganging Up bonus often. Knocking down a model can kill whole activations, if they cleared KD already or don’t have momentum (since they used their advance to trigger Rush Keeper). Sometimes to get around Rush Keeper a player will move up a less important target first to get it out of the way, so you may want to keep Compound’s threat there for future rather than using it, but that’s rare. DEF5 models can also avoid Rush Keeper by using Defensive Stance to go to DEF6 and avoid most of the impact. Some models can also avoid both a KD and a Push, letting them do their thing without any penalty bigger than a Crowding Out die – the most common example is Hammer if he’s near vChisel or under Tower’s heroic play.
Compound is a great choice if you’re planning on scoring early and don’t want to deal with a snapback goal, or you think the enemy is going to want to come towards your team, whether to fight you or to score. Against footballing teams a combination of Compound and Naja really makes them suffer if they want to get goals. Fighting teams also don’t want to deal with Compound, and he’s also pretty good against ranged control with Resilience. He doesn’t like AOE effects much and is only relevant if the enemy is coming towards you – this means he’s somewhat less relevant in a more aggressive Midas lineup, and doesn’t feel as impactful into teams which can face off against Alchemists in a standoff, such as Engineers, or teams which have ways of forcing engagements on their own terms, such as Corsair fishermen. Other than a few specific matchups though, Compound is a great include into a lot of teams – Rush Keeper doesn’t happen often, but when it does it completely changes entire games and can really ruin an opponent’s plan. He’s also a very influence efficient model which lets you more easily fuel your inf-hungry captains and other squaddies.
Overview
The Alchemists are a team with a lot of fantastic tools, and pretty much all of their unique abilities revolve around juggling conditions correctly, whether on your own models or on the enemy’s. If you can get the conditions out, your team does really scary things, and can get almost as many inf worth of free effects for pulling conditions as you get actual influence. This is pretty important, because the team’s actual influence is often somewhat low impact. Spending 2 inf on a Fire Blast or Noxious Blast is often less impactful than buying two attacks for some damage and momentum, but it’s still really good if you’re doing it for free, meaning you can spend your actual influence on things that generate momentum or VPs (or both). The Alchs’ statlines don’t really lend themselves to a fair fight, in a similar way to the other ‘ranged damage’ guilds like the Engineers and the Hunters. Instead, their primary melee ability is either focused on grabbing the ball and scoring before escaping again, or cleaning up the battered and burned models which actually reach your lines. The Alchemists are great at applying chip damage to models, and because they can put conditions on the enemy pretty much for free they’re also quite good at messing with the enemy momentum reserves. They don’t have any models that can really one-round an enemy from full HP (unless Smoke hits a load of Infuses across a turn line) but they’re just fine at doing 6-10 damage to someone who’s already taken a bit from the various conditions which are on them and the character plays they got tagged with.
Whether or not the Alchemists want to actually be aggressive or not varies a lot by matchup. Generally, the teams which are best at killing the ball are also slower, more vulnerable to ranged damage, or have a lot of low defense numbers and higher armor instead. This means you’ll often want to change up your plans for how to attack the enemy depending on what they’re playing. If they’re a team like Masons, Blacksmiths or Morticians which can control a ball well, you can bombard them from range to soften them up before grabbing some takeouts, and pressure the ball as a way to force them to put resources somewhere other than outfighting you. Even if your opponent is killing the ball, you can still probably get 1-2 goals a game anyway if you dedicate the resources to it – Alchemists are very much not lacking for good footballing models. Most of the time your opponent’s priority is going to be reaching engagement – while your team does a lot of useful things at range, in melee the opponent has a much easier time generating momentum to clear all your conditions or heal their models, and they also
The Alchemist 12 quite tough to build. vCalculus is a situational inclusion because oCalculus is just so good it’s very hard to ever cut her anyway. You could also drop a Mascot – Naja is more good relevant in some matchups than other while Flask is universally handy, but neither mascot is so essential to your game plan that you’ll be particularly unhappy if you cut either one of them. Both Katalysts are solid, but vKat is a bit better at being the sole damage threat on your team.
When selecting a 6 from your available options, things change a lot depending on whether you’re kicking or receiving and which captain you’re playing. If you’re kicking, you likely want to include Vitriol, which means you also want either oKatalyst or Venin – and those two models often work at their best when they are together so you don’t have a single fighting model stuck in the enemy team risking their life. You do have other kicking options though – Crucible is a solid choice, as are Kami and vCalculus. Crucible is generally a great include if the opponent has any ball killing ability whatsoever – Great Balls of Fire is the only good way to bypass Close Control in the faction, and Crucible is just generally a solid footballer, if you can keep her alive. Kami has similar footballing power to Crucible – she doesn’t get round Close Control quite as well, but instead is great at breaking Resilience, and she’s not as flimsy. Against enemy footballing teams when you want ball control of your own, Compound is a great choice – he’s also fantastic into fighting teams who want to come to you, and only easy to cut from a lineup if your opponent is on a similar ranged/control game to your own. In a Midas lineup, you generally want two threatening models you can fully stack and move up on turn one with Lure of Gold. In a Smoke lineup, instead you want some damaging options which play keep-away a bit better so you can finish people off after Smoke applies damage to the team – which makes Mercury look like a particularly solid option. Soma can work with anyone, but he wants a Katalyst for certain even more than Midas does. The nice thing about the Alchemists’ lineup is that they have a lot of influence efficiency tools, and most of their models can fulfil multiple roles or support themselves if needed rather than only having one tool to do any individual job, which means the lineups are really flexible and can be shifted around. The big thing to remember is that you usually have to actually commit your models in order to get VPs, and they’re probably going to be taken out in return, so trading up is important whether that’s scoring a goal so you trade 2VPs for 4, or setting up Katalyst or Soma to get multiple takeouts across a turn line by going last then first. The Alchemists’ access to burning and a lot of mobility tools means they’re great at manipulating the enemy threat ranges and ensuring that fights start on their own terms.
Until next time,
-Henry
